Wednesday, March 28, 2012

Favorite flashbacks: Alphabet Activities, Letter R

Revisiting some of my favorite posts and projects...

Alphabet Activities: Letter R

Munch and I had "R Day" a couple of weeks back...or is it a couple of MONTHS now? We did the usual routine of making the letter with wood pieces and practicing writing it, but the fun part was making the rainbow cookies. The cookies themselves tasted just okay and I might tweak the dough in the future, but the best part was how sturdy it was and its texture lent itself well to lots of handling. This activity was particularly fun because Munch and I could revisit primary colors and color mixing as well. I got the recipe from the DLTK's Sites: Growing Together, which has been my resource for a lot of the great alphabet activities Munch and I have done together. The original recipe calls for forming the dough into one large rainbow, from which kids can break off pieces, but I like our smaller rainbows better.

Rainbow Cookies
1 c. sugar
1 c. butter, softened
2 c. flour
1 tsp. vanilla
1 egg
food coloring- red, blue, and yellow

In a mixer, beat together the sugar and butter. Scrape down the bowl before adding the egg and vanilla. Mix well to combine. Add the flour and mix well. Turn the dough out onto a board and divide dough into three balls. Add a different food coloring (red, yellow, blue) to each ball until dough is desired color. I kneaded in the food coloring before handing it off to Munch to finish just to be sure the color didn't ooze out and stain the work area.Divide each ball of dough into three smaller balls (I actually broke each ball of dough in half to start, then one half in half again, if that makes sense since I knew I would be combining colors). Leave the large dough ball its original color and use the remaining smaller two to mix with the other primary colors. Here's Munch kneading red and blue- it made the strangest grey-ish purple so added more coloring to it to make it more vibrant- it ended up fine once I baked it, not grey at all.Next we took each of our six colors and flattened it into a long rectangle.Then we stacked/layered the colored rectangles, beginning with purple at the bottom-I sliced the dough thinly, about 1/3-inch or so, then passed them to Munch to shape into a rainbow curve.After putting them on a parchment-lined baking sheet, we baked the cookies at 350 degrees for 9-11 minutes, until they just began to turn golden at the edges. This batch is all ready for the oven!

Tuesday, March 27, 2012

Favorite Flashbacks-Word Art

Revisiting some of my favorite posts...

Word Art
As crazy as the holidays get, one thing I really enjoy doing over the winter break is collaborating with Munch to make art for the family. This year I was inspired by the "subway art" I've seen in many DIY blogs.

I began with this- one of several paintings Munch did a couple of summers ago when she was just beginning to explore with paint. I never cared for the muddiness that came from the brown and was just waiting to paint over it.
We started out by layering a mixture of black, brown, and red paint onto the canvas with a palette knife. I really liked how the brightness and texture of the previous painting enhanced the darker paint, making it richer and more interesting.
While it dried, I asked Munch for words and phrases that she associated with her grandparents. I sketched out a rough plan before typing them into the computer as word art, using a variety of fonts and sizes, in block letters. After printing them, I (very) carefully cut them out- the exacto knife (love those!) came in handy. Since I didn't have any modge-podge in the house, I thinned some Elmer's glue with water (about 3 parts glue to one part water), painted it onto sections of the canvas, and attached the word art. I found that the letters tended to wrinkle up a bit when wet, so I patted them down to better adhere to the canvas- the wrinkles themselves I didn't mind as they added more interesting texture.
Once the letters were fairly dry and ready for another coat of sealer, I thought they seemed a little "bright" so I mixed a few drops of brown paint into my next batch of thinned-out glue. Munch painted over the entire canvas with this mixture- the layer of paint started to bleed into our glue mixture, but I liked the effect.

The last things we added were collage materials that we rummaged around for in Munch's art area:
one of Munch's drawings of herself
an ice cream cone made from some a scrap of cereal box cardboard, tissue paper, and iridescent confetti
a shopping bag made from a bit of string and a Target logo cut from one of their mailers
a bit of ribbon
a few buttons
a foam heart sticker
a bowl of mac & cheese (our favorite addition) made from a bit of blue tagboard and some dry macaroni pasta that we painted orange

We painted on a final coat of glue to the entire project after attaching the materials above.
Time spent- much, but certainly not all, of a day
Money spent- nothing- I was still in my jammies and had no intention of leaving the house for supplies. We got creative with the materials we had on hand.
End result-

Monday, March 26, 2012

Favorite Flashbacks-Spangly Heart Cookies

Revisiting some of my favorite posts and projects...

Spangly Heart Cookies
Lately, I've been giving Munch more and more responsibility in the kitchen. She measures out ingredients for me, mixes things up, and (most exciting to her) she's gotten a chance to cut up celery using a "real" knife (one of my paring knives). Munch's cousin recently passed a cookbook on to her and we finally got around to trying one of the recipes.After going through the recipes, she decided on the "Spangly Heart Cookies". I liked that the recipe used reasonable quantities of ingredients for Munch to handle and that the straight-forward directions were also accompanied by a picture so I didn't have to explain much.
A few days ago I picked up a brightly colored set of measuring cups and spoons for Munch at Cost Plus. I figured it would be easier for her to remember the various sizes if they were also different colors.Once I softened the butter in the microwave for her, everything was easy for Munch to mix by hand. The only other thing I did for her was crack and separate the egg- she didn't want her hands to get dirty!Munch has also been wanting to wash the dishes herself, so she got going on that while the cookie dough chilled in the refrigerator.After a quick chill, Munch rolled out the dough and cut out the heart shapes before brushing on an egg white wash and sprinkling the cookies with pink sugar.Transferring the cookies to a rack to finish cooling-Just like the book!A proud Munch-

Sunday, March 25, 2012

Flashback Favorites: Alphabet Activities, Letter M

Revisiting some of my favorite posts and projects...

Alphabet Activities: Letter M
I feel terrible about posting so infrequently lately. Munch has kept us on the move with her busy social calendar every weekend. It's been a lot of fun getting to meet her new friends and their families have been really nice. I was relieved to have a day off for the holiday, even though AudioDad had to work. Munch and I decided to get back to our letter activities, so we tackled M,m today. We started off making the letter M with wood pieces and Munch was delighted to discover she had made the word "moo". Of course, I got sound effects to accompany the word making:Next, we moved on to her alphabet workbook. Munch found the stickers with M words and practiced writing the letter-before beginning her letter collage onto which she glued some dry macaroni-We had a puppet to assemble- and Munch loved making her monkey-
I was really excited about our super cute, super easy food project after getting the idea off the web. I melted some pink candy melts while Munch stuck marshmallows onto lollipop sticks. The marshmallow pops got a dip in the pink candy then sprinkled with decorations The only tricky thing was where to put them while they cooled and the coating dried- they were too top heavy to stand in a tumbler. In the end, I propped a cooling rack on a few cans which worked perfectly!Munch got to enjoy one as part of, what else? A muffin tin meal! I filled it with bunny mac & cheese (Munch's favorite), meatballs, macadamia nuts, mandarin orange segments, and a marshmallow pop- all washed down with a glass of milk-After naptime, which gave me a chance to clean up, Munch and I finished up her mermaid craft. Earlier in the day, she painted some tissue paper (a la Eric Carle) with green, teal, and blue dot markers
After it dried, she glued squares of her painted tissue paper onto a mermaid shape and decorated it with sequinsI cut it out for her and we glued it onto a water-scene background done in glitter glue-Last activities for the day were a batch of "hide and seek" muffins to go with dinner (the cherries she pushed into the center of the batter sink into the center of the muffin during baking)and some exploration with magnets.

Sunday, March 18, 2012

Wiggly Giggly

Have you heard of "eyebombing"?


A form of public art, you basically take those craft store "googly eyes" and stick them onto objects out in public, or as the eyebombing website states: "Eyebombing is the act of setting googly eyes on inanimate things in the public space. Ultimately the goal is to humanize the streets, and bring sunshine to people passing by."

Cute, isn't it? I think I may start carrying those peel and stick wiggly eyes around town with me!

Saturday, March 17, 2012

Sharing the Kitchen

Munch is now a very grown-up six years old and I have been working on giving her more independence in the kitchen. A couple of years ago, I bought her a set of measuring cups and spoons at Cost Plus; each cup or spoon was a different color, making it easier to give her directions when measuring out ingredients (an orange cupful, rather then 1/2 cup). For the most part, I handled reading the recipes and let Munch practice measuring, pouring, and mixing.
Munch is a much better reader now, and between cooking and baking with me and her aunt, she has internalized a lot of the steps of cooking. She knows to keep the dry and wet ingredients separate when baking, that a pan should be hot enough that you hear a sizzle when something is added. I can trust her to use a paring knife to cut things up. However, recipes as they are written in cookbooks remain a challenge- they are still too wordy for Munch, and often printed in a small enough font that she often loses her place. I have taken to rewriting ingredient lists and simple instructions for her on a separate piece of paper, which helps tremendously. She can now make a batch of chocolate chip cookies on her own, with me handling the oven for her. I do however, let her check on the cookies' progress and determine if they need more time or are ready to come out.
The newest recipe Munch has tackled is a mix-in the pan chocolate cake. All the dry ingredients are sifted and mixed directly in the pan before adding the wet ingredients. It's fun for kids because they also create a hole to place the baking soda in, then pour vinegar over it creating a mini volcano.

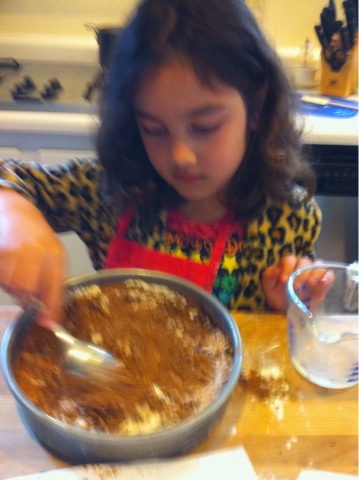
Mixing the dry ingredients- flour, cocoa, brown sugar, and salt

Watching the baking soda and vinegar bubble

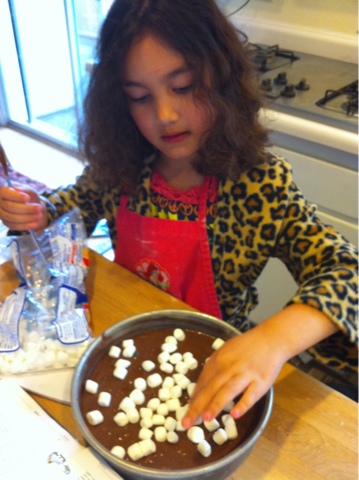
Sprinkling marshmallows over the cake batter before putting it in the oven

Recipe: Munch's "Moon Mud" cake, also known as a mix-in the pan chocolate cake, or a "craters of the moon" cake because of the way ingredients are added to "craters" in the dry mixture

Preheat the oven to 350 degrees.

Sift the following dry ingredients directly into a 9 or 10-inch round cake pan (I have found it more difficult for kids to mix thoroughly in a square pan due to the corners) and mix carefully until it looks like light brown sand.

1 1/2 cups flour
1/2 cup sugar
1/2 cup brown sugar
1 teaspoon salt
4 tablespoons cocoa powder

Add 1/2 cup of mini chocolate chips to the sand and mix in.

Use a spoon to dig out three holes, or "craters", in the sand- small, medium, and large.
In the largest hole, pour in 5 tablespoons melted butter.
In the medium sized hole, spoon in 1 teaspoon baking soda.
In the smallest hole, pour in 1 teaspoon vanilla.

Here comes the fun part- Pour 1 teaspoon white or cider vinegar over the baking soda and watch it foam and bubble!
When the bubbling stops, pour 1 cup milk over the all the sand and mix carefully until it looks like smooth mud.

Scatter about 1 cup of mini marshmallow "rocks" over the top of the batter.

Bake the cake until a toothpick stuck in the center comes out dry/clean- about 40-50 minutes. Let the cake cool in the pan, then slice and serve.

Monday, March 12, 2012

Munch's Annual Interview

I've been doing a New Year's interview for the last few years. It's nice to have something to remember Munch at each age. We fell a little behind this year, but better late than never!

Munch, 6 years old, fabulous as ever!
Munch, Age: 6 years
Grade: Kdg

Favorites:
Color: Gold
Animal: Unicorn
Restaurant: In N Out
Number: 100
Vegetable: Carrots
Book: Ivy and Bean
Game: Fairies
Food: Root beer float
Place: Home
Candy: Cotton candy
Best friend: Bella

What makes you happy? When I get to stay home with my mom and my dad.
What do you love best about your family? That I have one. 
What is the smartest thing you know how to do? Like 1+1.
What is hard for you to do? Minuses because I can do pluses a little more gooder.
What is your favorite thing to do? Go on my trampoline. 
What do you want to be when you grow up? A dog sitter. 
What will you get to do now that you're six? I get to learn more stuff that I haven't learned yet. 
If you could be in charge for the day, what would you do? I would clean the house.
What is your wish for this year? Go to Marine World (Six Flags Discovery Kingdom) because I haven't been there in such a long time. 

Not yet a FOLLOWER?  What are you waiting for???

Sunday, March 11, 2012

Pinch Me...Pt. 2

So the last few months have seen us getting settled into our new home. I got right to work painting most of the rooms before we brought the furniture out of storage. The house is much smaller than our last home, but its dark walls made it look even smaller. A fresh, lighter color just brightened the whole house!
The kitchen before...
during...
and after...
Dining room before...
and after...
We were fortunate that this house has freshly refinished wood floors and new windows. Once the new paint color went up, all our furniture seemed to make so much more sense than it did in the old house- what was left of it, anyway (remember, MUCH smaller house...must need to pare down!) We have beautiful hills and open space surrounding our neighborhood. I reduced my commute from well over an hour each way to about 10 minutes, and once the first day of school rolled around last fall, we were pleasantly surprised to find that many of Munch's preschool friends live within a block or two. We have so much more time together as a family, and are within a few miles of Munch's grandparents and cousins. Money is tighter than ever, having sold our first house at a loss and purchased this new one for more than double the value of the last. We're still trying to spruce up the house and yard, figure out our new routines, and have found that driving home still doesn't have that familiar feeling yet. But I NEVER would have guessed a year ago that we would be where we are today- it is so much more than I dared to want.